
Guide to PMU Needles
Permanent makeup, also known as cosmetic tattooing, is a method of implanting ink into the skin in order to mimic the look of makeup. As a licensed permanent makeup artist, I gravitate towards specific materials & tools because they have a significant impact on our work alongside our technique & skills. One of the most important things to think about is choosing the right permanent makeup needle cartridge. The right needle for the right skin can help your machine glide onto the skin as you work on the client and help to implant ink better and decrease trauma to the overall skin. In this post, I’ll walk through the types of needle cartridges and how different types can be utilized.
There are 4 main aspects to consider when looking at permanent makeup needles - diameter, count, configuration, and taper. Every cartridge box you purchase will have an identification marker and will represent the 4 factors as shown below:
1001RLLT
10 -> Diameter
01 -> Count
RL -> Configuration
LT -> Taper
1. Needle diameter
Refers to the diameter of your needle at its widest point before it tapers.
Size # 06 – 0.20mm
Size # 08 – 0.25mm
Size # 10 – 0.30mm
Size # 12 – 0.35mm
Size # 14 – 0.40mm
i.e.) 1003RSST would mean that the needle diameter is 0.35mm
I typically stick to #08 - #12 for needle size, depending on the client skin type, sensitivity, and pore size. Smaller needle sizes are best for clients with thinner/mature, sensitive skin, or skin with smaller pore size. The bigger the needle size, the more it can cause trauma, especially for those with sensitive & thin skin. Bigger needle sizes are best for clients with thicker skin, or skin with large pores as larger needle points will be able to penetrate the skin properly and implant the ink.
2. Needle Count
Is the count of how many needles you are working with. For instance, you can have 1 needle, 3 needles, 5 needles, etc., that are configured together in a single cartridge.
i.e.) 1203RSST means that there are 3 needles in this single cartridge.
As an artist, I stick to 1-3 needles most of the time, depending on the type of skin, procedure, and how well the skin is responding to the specific needle I’m using. For instance, I may opt to use a 1203RS to do an ombre brow for a client with oily, thick skin, because a larger sized needle, coupled with 3 needles can help me penetrate the skin a lot easier and faster than a smaller needle with just 1 needle (which I would opt for more often on clients with thinner skin to prevent unnecessary trauma).
3. Needle configurations
Refer to how the needles are configured in the cartridge.

Round liners & round shaders are the most common configurations used by permanent makeup artists as they can be precise & versatile. Round liners are grouped together tightly and are often used to line. It is very versatile because it can not only be used for outlines and make finer hairlike strokes but can also be used to shade. Round shaders are grouped together like the liners but they are spaced out a bit further. They are great to use for shading brows or larger surface areas to help you speed up the process. While flat & magnum configurations are not as common to use during a permanent makeup procedure, they are used for very specific purposes. For instance, when working on a client for lip blushing and you have a lot of surface area to cover, you may want to try a magnum configuration as they will saturate the lips a lot faster. That said, lips can be very sensitive and without caution, this type of configuration can break the skin too much and cause excessive trauma to the skin, ultimately leading to a poor healed result.
4. Needle Taper
Refers to the length of your permanent makeup needle point.
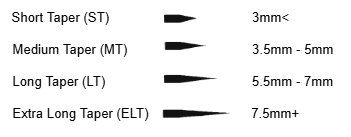
The taper length plays a role in how much ink flow there is as well as how much trauma you are causing to the skin.
Short taper:
More ink flow aka quicker saturation
More trauma to skin
Long taper:
Less ink flow aka slower saturation
Less trauma to skin
For instance, I might choose a long taper for a mature client as their skin may be more fragile & thinner and I want to minimize trauma to the skin.
All of these factors (diameter, count, configuration, and taper) should be considered on a case-by-case basis as you work with different types of clients. The more knowledgeable you are, the more you can effectively implant ink during your permanent makeup session, decrease trauma to the skin, and improve the overall healing process for your clients!